9 Beautiful Quick Donut Buns You Can Try In 2023
When it comes to achieving an effortlessly elegant look, your hairstyle plays a crucial role. Your hair is like the crown you never take off, and it has the power to transform your entire appearance. Whether you’re getting ready for a special occasion, a night out, or simply want to look and feel your best every day, the way you style your hair can make all the difference.
In the world of hairstyling, there’s a classic choice that never goes out of fashion and consistently exudes elegance: the donut bun. This timeless hairstyle has been adored by generations for its simplicity and sophistication. It’s a versatile option that suits a wide range of occasions, from casual gatherings to formal events.
In this comprehensive article, we’re going to delve deep into the art of hairstyling with a focus on “9 Beautiful Quick Donut Buns: Easy Hair Styling For Effortless Elegance.” Our goal is to provide you with not just step-by-step instructions but also the knowledge and confidence to create stunning donut buns effortlessly. We understand that achieving the perfect look can sometimes feel overwhelming, but with our guidance, you’ll discover that creating these beautiful hairstyles is not only achievable but also an enjoyable and empowering experience.
9 Beautiful Quick Donut Buns
The Classic Donut Bun
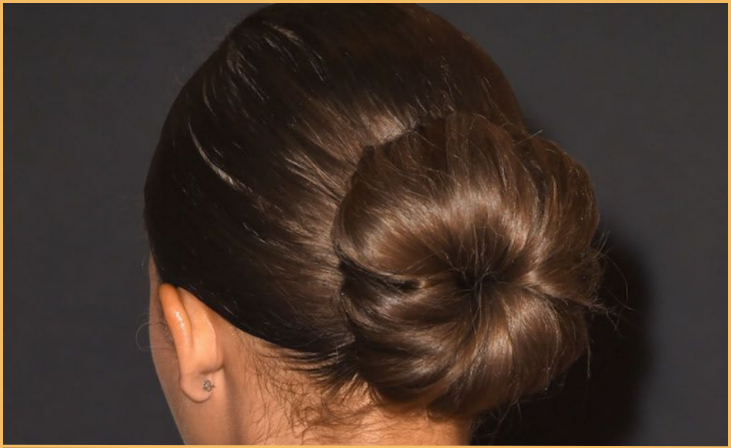
The classic donut bun is a timeless and versatile hairstyle that suits various occasions. It’s an elegant choice that can be dressed up or down depending on the event. To create this iconic look, follow these simple steps:
Gather your hair into a high ponytail: Start by brushing your hair thoroughly to remove any tangles. Then, using a hair tie, secure your hair into a high ponytail at the crown of your head. Make sure it’s tightly fastened to prevent any loose strands.
Slide a donut bun maker onto the ponytail: A donut bun maker is a circular foam or mesh accessory that provides the structure for your bun. Slide it onto your ponytail, positioning it at the base.
Spread your hair evenly around the bun maker: Carefully spread your ponytail hair over the donut bun maker, ensuring that it covers the entire surface. This step helps create a uniform and full bun.
Secure with an elastic band and bobby pins: Once your hair is evenly distributed around the bun maker, use another hair tie to secure it in place. Then, tuck any loose ends under the bun maker and secure them with bobby pins. This will give your bun a neat and polished appearance.
Finish with hairspray for a polished look: To ensure your bun stays in place throughout the day, spritz it with a light-hold hairspray. This step adds a touch of shine and keeps any stray hairs at bay.
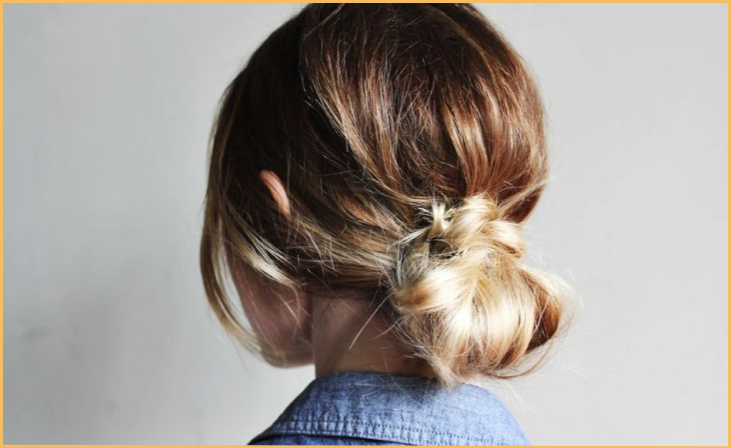
The Messy Bun
The messy donut bun is the best choice if you want to feel more casual but still classy. It’s both casual and stylish at the same time. To get this look, follow these steps:-
Start with a loose ponytail: Begin by creating a loose ponytail rather than a tight one. This will set the foundation for the messy style.
Insert the donut bun maker: Slide the donut bun maker onto your loose ponytail, positioning it at the base as before.
Wrap your hair around it haphazardly: Instead of neatly spreading your hair, wrap it around the bun maker in a slightly haphazard manner. Allow some strands to stick out for that “messy” effect.
Secure with pins: Once your hair is wrapped around the bun maker, secure it with bobby pins. The key here is not to make it too tight; some looseness adds to the charm.
Gently pull out a few strands for a messy finish: To enhance the messy look, gently pull out a few strands of hair around your face and the bun itself. This adds softness and a carefree feel to the style.
The Low Donut Bun
You can dress up a low donut bun for a formal event by adding a touch of sophistication. Elegant, it’s perfect for showing off statement jewelry or a beautiful neckline. This classy look can be yours by following these steps:-
Make a low ponytail: Start by putting your hair in a low ponytail at the base of your neck. Make sure there are no bumps and that it’s smooth.
Place the donut bun maker on it: Slide the donut bun maker onto your low ponytail, positioning it near the base of the ponytail.
Wrap hair around the bun maker: Just like with the classic bun, spread your hair evenly around the bun maker to cover it completely.
Secure and tuck in any loose ends: Secure your bun with a hair tie and ensure that any stray ends are neatly tucked into the bun.
Add a decorative hairpin for flair: To take the look to the next level, think about adding a hairpin or other accessory that matches your outfit and the formality of the event. This makes the look a little more fancy.
The Braided Donut Bun
The braided donut bun combines elegance with creativity, making it a standout choice for special events or when you want to express your individuality. Follow these steps to achieve this stunning look:
Create a traditional three-strand braid: Start by dividing your hair into three equal sections at the back of your head. Braid these sections together in a traditional three-strand braid until you reach the end.
Coil the braid into a bun shape: Once your braid is complete, gently coil it into a bun shape, starting from the end of the braid. Keep coiling until you’ve formed a neat bun.
Secure with pins: Use bobby pins to secure the braided bun in place. Make sure the pins are discreetly placed to maintain a polished appearance.
Pull out a few strands for a softer look: To soften the style and add a touch of romance, gently pull out a few strands of hair around your face and near the bun. This creates a more relaxed and whimsical feel.
Pin a flower or accessory for a chic finish: To make your braided donut bun even more captivating, consider pinning a real or artificial flower or a decorative hair accessory onto the bun. This adds a unique and chic element to your hairstyle.
These are just a few of the beautiful donut bun styles you can explore to enhance your elegance and charm. Each style offers its own distinct personality, allowing you to choose the perfect donut bun to match your mood and the occasion.
The Half-Up Donut Bun
Elevate your everyday look with a touch of elegance by trying the half-up donut bun. This style is versatile and adds a romantic flair to your appearance. Here’s how to create it:
Part your hair into two sections: Begin by parting your hair horizontally, dividing it into two equal sections. You can use a comb or your fingers for this step.
Create a donut bun on the top section: Take the top section of your hair and follow the same steps as you would for a classic donut bun. This means sliding a donut bun maker onto the top section’s ponytail and spreading your hair evenly around it.
Secure the bun and let the rest flow: Once your top bun is secure, use a hair tie to fasten it in place. Now, the lower section of your hair remains flowing, creating a lovely contrast.
Curl the loose hair for a romantic touch: To enhance the romantic feel of this style, you can use a curling iron or curling wand to add soft waves or curls to the loose hair. This adds depth and elegance to the look.
Also Read:- Stylish Haircuts For Pinays
The Sock Bun
What if you don’t have a donut bun maker? No worries! You can still achieve a beautiful donut bun using a simple sock. Follow these steps to create a sock bun:
Cut the toe section off a sock: Find a clean sock that matches your hair color. Cut off the toe section, leaving you with a tube-like shape.
Roll the sock into a donut shape: Roll the sock from the open end towards the cut edge to create a donut shape. This will serve as your bun maker.
Make a high ponytail: Gather your hair into a high ponytail at the crown of your head and secure it with a hair tie.
Slide the sock onto the ponytail: Position the sock bun maker at the base of your ponytail and slide it up towards the tip.
Wrap hair around it: Spread your hair evenly around the sock bun maker, covering it entirely.
Secure and style as desired: Secure your bun with another hair tie or bobby pins. You can also add accessories or leave some strands loose for a personalized touch.
The Double Donut Bun
Make a bold fashion statement with twin donut buns. This unique and trendy style is perfect for those looking to stand out. Here’s how to create the double donut bun look:
Divide your hair into two equal sections: Start by parting your hair down the middle to create two even sections, one on each side.
Create donut buns on each section: Follow the same steps for creating a classic donut bun on each section. You’ll have one bun on the left side and another on the right.
Secure and position them symmetrically: Use hair ties and bobby pins to secure both buns in place. Ensure they are positioned symmetrically on each side of your head.
Add decorative pins for a trendy look: To enhance the trendy and stylish aspect of this hairstyle, consider adding decorative pins or hair accessories to both buns. This adds a touch of individuality and flair to your look.
The Side Donut Bun
For a charming and asymmetrical appearance, the side donut bun is an excellent choice. It’s a style that works well for both casual outings and more formal events. Here’s how to create this charming look:
Gather hair to one side: Begin by brushing your hair and gathering it to one side of your head. You can choose which side you prefer for the bun.
Create a donut bun at the ear level: Instead of placing the bun high on your head, position it at the ear level on the side where your hair is gathered. Follow the same steps as for a classic donut bun.
Secure and let some strands drape gracefully: Use bobby pins and a hair tie to secure the bun in place. Allow some loose strands to drape gracefully around your face for a romantic and slightly undone look.
The Floral Donut Bun
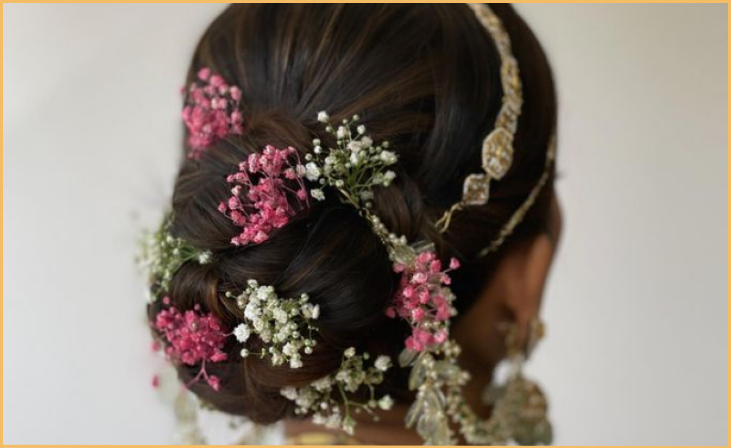
Infuse the beauty of nature into your hairstyle with the floral donut bun. This style allows you to incorporate real or artificial flowers, adding a touch of enchantment to your look. Here’s how to achieve this charming and natural look:
Create a donut bun as desired: Start by choosing the type of donut bun you prefer, whether it’s a classic, messy, low, or any other style mentioned earlier.
Decorate it with real or artificial flowers: Select your favorite flowers, either fresh or artificial. These can be small blossoms or larger blooms, depending on your preference.
Secure them with bobby pins: Carefully place the flowers around the bun, securing them in place with bobby pins. Ensure that they are evenly distributed and that the colors complement your outfit and the occasion.
By incorporating flowers into your donut bun, you not only add a natural and refreshing touch but also create a unique and eye-catching hairstyle that’s perfect for outdoor events, weddings, or simply when you want to embrace the beauty of nature.
Conclusion
In the world of hairstyling, donut buns are a timeless choice for achieving effortless elegance. With these 9 beautiful quick donut bun styles, you have a variety of options to choose from, whether you’re headed to a formal event or just want a chic look for a casual day out. Experiment with these styles and let your hair be a reflection of your unique style and personality.
Frequently Asked Questions (FAQs)
Absolutely! Donut buns are versatile and can be styled to suit both casual and formal events.
Yes, donut buns work well with long hair. In fact, the added volume can make them even more stunning.